An all-in-one electric brewing system takes the three worst parts of a brew day, the propane shuffle, the scorched kettle bottom, and the twenty minutes of hose swapping during the chill, and folds them into one vessel with a pump and a controller. I have brewed on a three-tier propane rig, a cooler mash tun, and a pickle barrel I converted myself, and the electric single-vessel route is the one I recommend to anyone who wants repeatable beer without building a sculpture in the garage.
But a system with a pump, a digital controller, and a mesh strainer is only as good as the process you run on it. This is the workflow I would run on a 60-liter electric brewery, plus the one half of the pipeline most people forget: a way to measure and ferment what you just made.
Why you should trust me
I am Drew Calloway, a homebrewer in Grand Rapids, Michigan, twelve years in and more than 50 logged batches deep. I spent 2019 through 2022 as the assistant brewer at a 7-barrel brewpub, where I scrubbed heat exchangers, harvested yeast, and ran gravity and pH checks on every tank, every day. By day I work as a process technician at a food-and-beverage plant, which means I spend my working hours thinking about temperature control, sanitation, and measurement drift, and my weekends applying the same habits to beer.
Every batch I brew gets its original gravity and final gravity read on a hydrometer I calibrate in distilled water at 60°F, plus strike temps, mash pH, the 24-hour gravity, packaging losses, and the exact garage temperature, all written in a spiral notebook with a spreadsheet backup. Cheap gear that fails mid-batch has cost me three ruined brew days, so nothing here gets recommended on a spec sheet alone.
How I picked and how I tested
The gear list in this article covers two halves of one job. The brew side makes wort. The fermentation side measures it, holds it, and moves it. If you buy only the first half, you own an expensive way to make sugar water.
The criteria I apply to any electric system are the ones that decide whether a brew day finishes or turns into a cleanup project. Can the controller hold a number I set, or does it wander? Does the pump move hot wort through the grain bed without clogging at the first sign of a fine crush? Does the chiller actually knock the wort down to pitching temperature in a reasonable window, or does it just look impressive in the listing photos? Does the mesh strainer lift out cleanly, or does it dump half its contents back into the kettle when you tilt it? And can I get every surface that touched wort clean, because a system with a hidden crevice in the recirculation path is a system that will eventually sour a batch.
For the fermentation side, the test is simpler and less forgiving. Does the kit include a hydrometer, because a kit without one cannot produce a repeatable beer. Does the siphon seal and hold prime. Does the airlock fit the vessel without wobbling. Does the glass survive being carried across a wet garage floor.
One note on how I work: I do not quote a gravity from a manufacturer's sheet, ever. If a number shows up in my notebook, it came off a calibrated instrument. That is the standard I hold this workflow to, and it is the standard you should hold yourself to whether you are brewing on a 60-liter electric system or a five-gallon cooler.
The gear that carries the brew day
Two pieces of equipment do almost all the work in this workflow. One makes the wort. The other measures and ferments it.
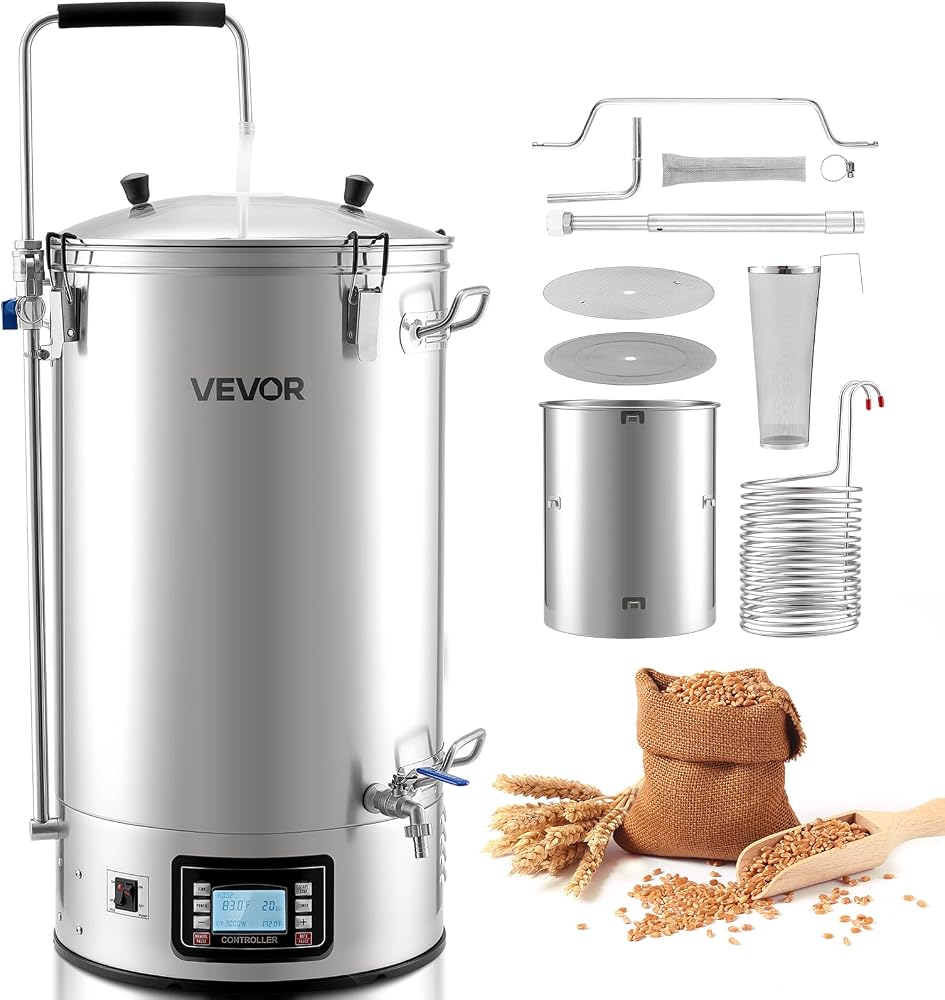
The brew side: VEVOR Beer Brewing Equipment, 16 Gal/60L Beer Maker with Anti-Burn Pump and Wort Chiller,3000W All-in-One Home Brewing Kit with Digital Control, Recipe Memory & Timer, Removable mesh strainer
 Visit on Amazon →
This is the vessel that replaces the burner, the mash tun, and the kettle. Three things in the description matter more than the rest. The anti-burn pump means recirculation, which means you can hold a mash temperature instead of watching it drift while you stir. The included wort chiller means the chill happens in the same vessel rather than through a separate immersion coil you have to sanitize and store. The removable mesh strainer is your mash basket, and being able to lift it out is what makes a single-vessel brew day possible in the first place.
The digital control with recipe memory and a timer is the part that changes how you brew. Instead of standing over a dial, you set a step, walk away, and come back when the timer says so. That matters most during the mash, where a temperature you did not hold is a beer you did not intend. It matters again during the boil, because the timer is what stops you from missing a hop addition while you are cleaning the strainer.
Flaws but not dealbreakers: 3000W is a serious electrical draw. Before brew day, figure out which circuit you are plugging into and what else lives on it. Do not share that circuit with a chest freezer or a window air conditioner unless you want to learn what a tripped breaker does to a 60-minute boil. The 16-gallon capacity also means you need to think about where the system lives permanently, because you are not carrying a full one to the sink.
Anyone moving up from extract or from a five-gallon cooler setup who wants repeatable step mashes and a chill that finishes in the same vessel should start here.
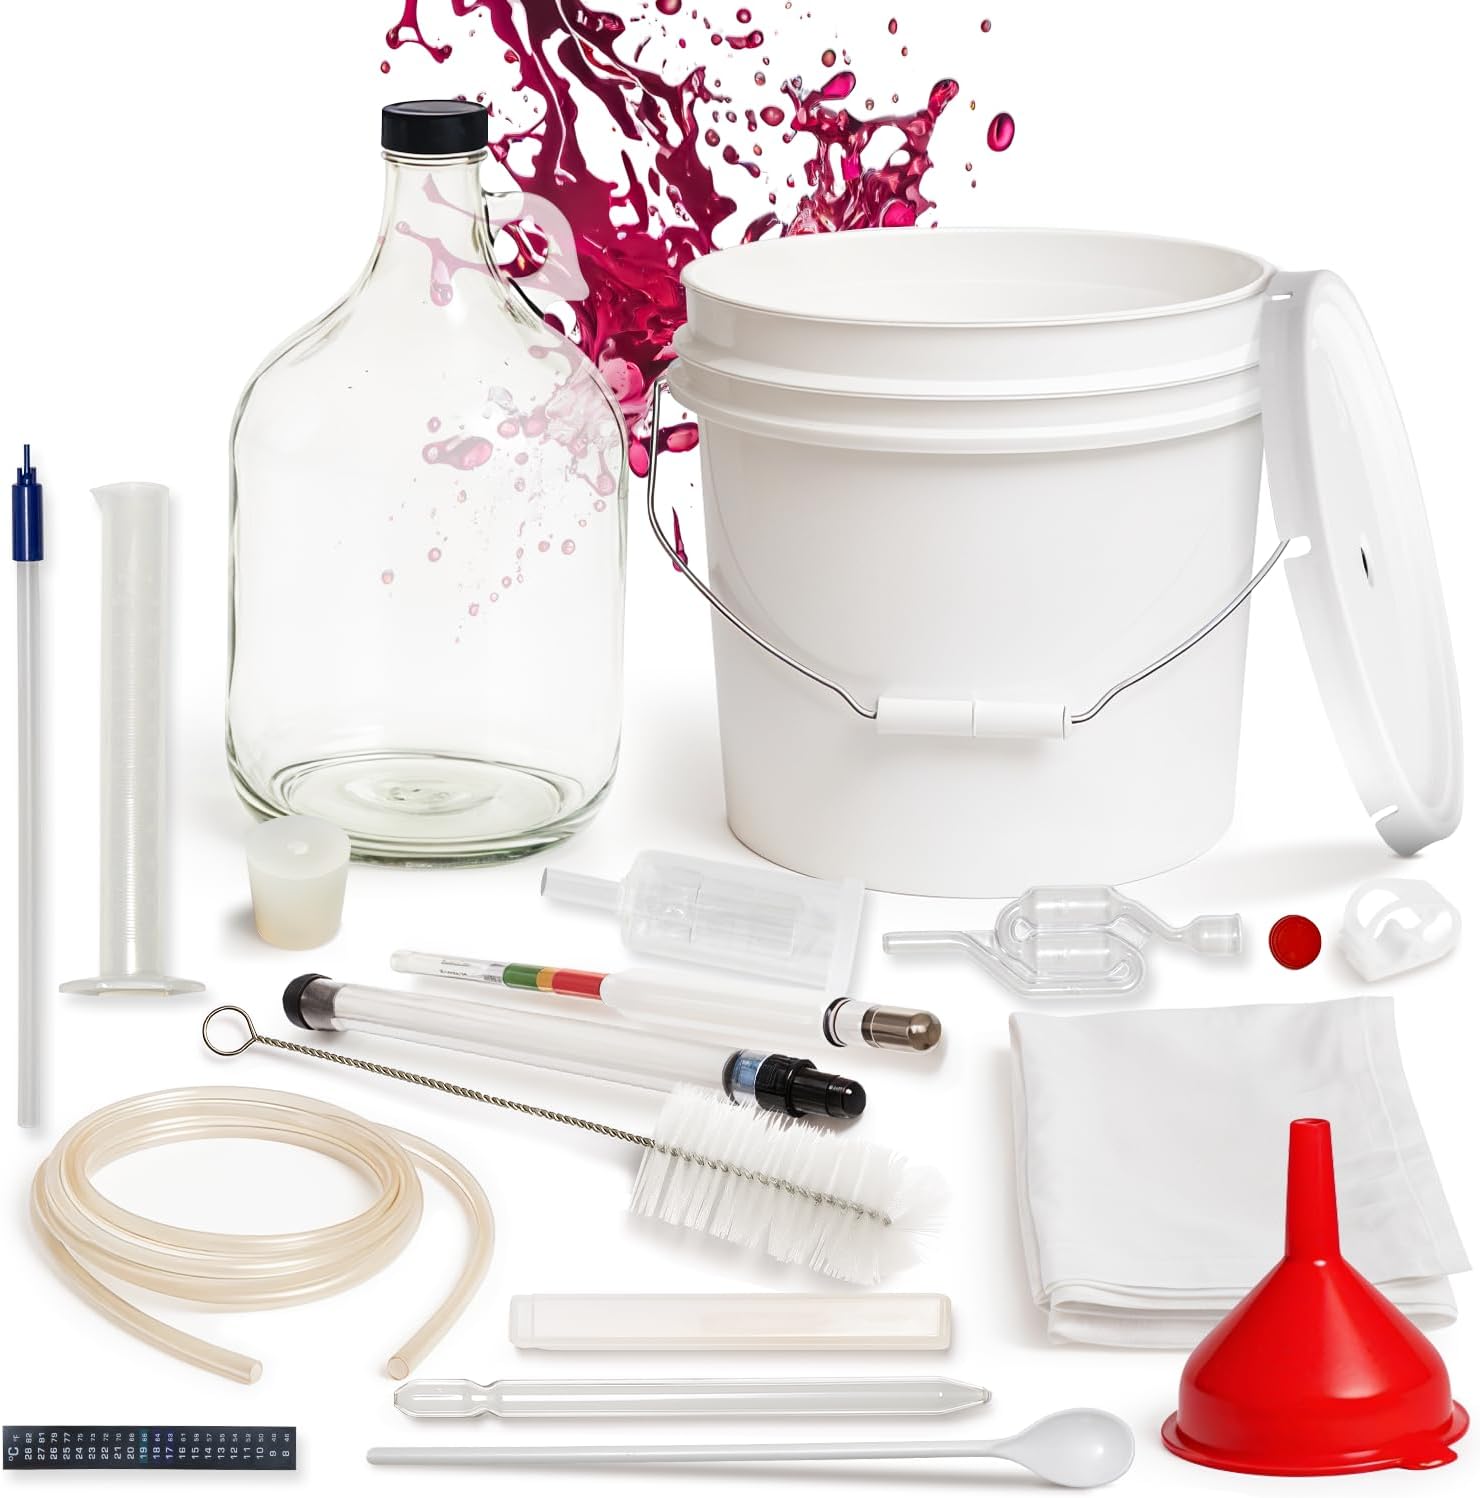
The fermentation side: Wine Making Kit & Mead Making Kit | Complete Home Brewing Kit for Beginners & Experts - Includes Glass Carboy, Fermenter, Hydrometer, Siphon, Airlock & More | DIY Wine Brewing Equipment
 Visit on Amazon →
The reason this kit belongs in a beer article is the hydrometer. My single loudest complaint about starter kits is that they ship without one, and you cannot brew consistently if you cannot measure. A kit with a hydrometer, a siphon, and an airlock covers the three things that happen after the boil ends: you measure what you made, you move it without oxidizing it, and you keep oxygen out while the yeast works.
The glass carboy is the other reason to own this. Glass does not scratch the way plastic does, and a scratched plastic fermenter is where wild yeast and bacteria set up permanent residence. Use it for secondary and for aging, and treat it with respect, because a wet glass carboy is the most slippery object in this hobby.
Flaws but not dealbreakers: This kit is built around wine and mead volumes, so match your fermenter to your batch size rather than assuming one vessel handles everything. A full 60-liter brew day produces far more wort than a starter wine kit is designed to hold, and you do not want to discover that at midnight with a carboy already full. Buy a carboy handle on day one. Your forearms will thank you.
Anyone who wants the measuring and fermenting half of the pipeline covered in one purchase, and who plans to brew wine or mead alongside beer, gets the most out of this.
The brew day, step by step
Here is the order I run. It works on any single-vessel electric system, and it works on this one.
Step one: calibrate the hydrometer. Fill a test jar with distilled water at 60°F and float the hydrometer. It should read 1.000. If it reads high or low, write down the offset and apply it to every reading for the rest of the day. A hydrometer that reads 0.002 off at the start reads 0.002 off all day, and an uncorrected offset turns a good recipe log into fiction.
Step two: check your power and your water. Confirm the circuit, then fill the vessel with your full volume of water. If you are brewing all-grain, that means strike water plus sparge water, and you want the math done before the element is hot, not while it is.
Step three: set your strike temperature and heat. Enter the number into the controller. If the system has recipe memory, save the profile now so you are not re-entering it at 6 a.m. on your next batch.
Step four: load the grain. Mill your grain, then load it into the removable mesh strainer. Stir it in slowly and break up every dough ball. Dry pockets in the grain bed are the number one cause of a low original gravity that nobody can explain later.
Step five: mash and recirculate. Start the pump once the grain bed has settled. You are looking for a steady, not violent, flow. If the flow slows to a trickle, you are heading toward a stuck sparge, so open the gap or stir the top of the bed. The pump is there to hold temperature evenly, not to compact your grain into concrete.
Step six: lift the basket and drain. Raise the mesh strainer and let it drain over the vessel. This is the messiest two minutes of the day, so have a bucket or a tray underneath and give it more time than you think it needs. Grain that is still dripping when you pull the basket is sugar you paid for and are now throwing away.
Step seven: boil and watch the first ten minutes. Set the timer, then stand there. The window between a rolling boil and a boilover is about four seconds wide, and it happens right after the hot break. Once you are past it, add your hops on the timer and stop hovering.
Step eight: chill in the vessel. Run the included wort chiller. Sanitize the chiller before it goes in, every time, because it is the one piece of gear that touches wort after the boil and the one most people skip. Stir the wort gently around the coil to speed the drop.
Step nine: transfer and pitch. Move the cooled wort into your fermenter with the siphon, leaving the trub and hop sludge behind. Take your original gravity reading now, before you pitch, and write it down.
Step ten: aerate, pitch, airlock, log. Get oxygen into the wort, pitch healthy yeast, fit the airlock, and record the original gravity, the pitch temperature, the yeast strain, and the date. Then leave it alone.
Where brew days go wrong
The failures are predictable, and almost all of them are process failures rather than equipment failures.
Boilovers happen because someone walked away during the hot break. Stuck sparges happen because the crush was too fine or the pump was running too hard. Infected batches happen because a siphon or a chiller got a rinse instead of a sanitizer soak. And flat, sweet, under-attenuated beer happens because the brewer never took a final gravity reading and packaged a beer that was still fermenting.
Temperature control during fermentation is where the biggest gap sits between what the instructions imply and what actually happens. Instructions that tell you to trust your instincts on temperature are instructions written by someone who has never tasted banana bubblegum in a beer that was supposed to be clean. Use a number. Write it down. Check it again the next morning.
One more: check your spigots and seals before you fill anything. A dripping fermenter spigot is the most common and most preventable failure in this hobby, and it always announces itself on the day you are busiest.
The competition and why it lost
The propane-and-cooler route still works, and I brewed some of my best beer on it. But it requires a burner, a mash tun, a kettle, a chiller, a pump if you want recirculation, and a place to store all of it. The electric single-vessel system collapses that into one footprint and one cord.
The stovetop extract route is cheaper and faster, and I will never talk anyone out of it as a first batch. But it will not teach you mash temperature control, and it caps your batch size at whatever your stove can boil.
The one-vessel systems that make you buy the chiller separately lose points for the same reason a starter kit without a hydrometer loses points. The accessory is not optional, it is the job. And the tiny one-gallon kits are a genuinely great gateway, but you will outgrow them by batch three, which is fine as long as you know that going in.
What I will not do is recommend a system that fails mid-batch to save a few dollars. A pump that dies during the sparge does not cost you the price of a pump, it costs you the whole brew day and every ingredient in it.
What this all costs
The brew-side system is the large line item, and it replaces three or four separate purchases, so compare it against the total of the burner, mash tun, kettle, chiller, and pump rather than against any one of them. Check current Amazon price for the VEVOR system before you decide, and check current Amazon price for the wine and mead kit as well, because the fermentation half is the smaller number of the two and the one people most often skip.
What you should budget beyond the gear: ingredients for your first three batches, a dedicated sanitizer, a large bucket for cleaning, and a carboy handle. That is the whole list.
The math that actually matters is not the purchase price. It is cost per batch, and that number falls every time you brew without losing a batch to a boilover, a stuck sparge, or a fermentation you never measured. Buy the gear that lets you hold a number, then hold it. Your notebook will tell you the rest.