Root beer is the batch I hand to people who tell me they don't have room to brew. A 1-gallon root beer brewing kit takes up less counter space than a stand mixer, needs no mash tun, no burner, and no garage, and runs on the same four things every batch of beer I've made in twelve years runs on: sugar, water, flavor, and yeast.
I've logged more than 50 batches, and I've watched a lot of first-timers quit after one. The reason is almost never the recipe. It's the bottles they didn't clean, the jug they left next to the oven, or the batch they forgot in a warm room for a week and came home to find wearing its own cap on the ceiling.
So this is the walkthrough I wish someone had handed me: what a complete 1-gallon kit gives you, what it doesn't, how the process actually runs from sanitizer to first pour, and the four places where small soda batches go wrong. It is not a beer guide. Root beer is a soda, it runs on a much shorter clock, and the failure modes are different.
Why you should trust me
I'm Drew Calloway. I brewed my first batch in 2014 on a dorm-room hot plate and spent three years as the assistant brewer at a 7-barrel brewpub in Grand Rapids, where I ran gravity and pH checks on every tank, every day. Since then I've logged 50-plus batches at home, each one with its OG, FG, strike temp, mash pH, and garage temperature written down in a spiral notebook with a spreadsheet backup.
What that buys you here isn't a pile of adjectives. It's a bias. I trust the number I read on a calibrated instrument and I don't trust the word "premium" on a box. If I recommend a piece of gear, it either survived a full brew day without embarrassing itself, or I tell you plainly that I haven't run it and what to check before you buy.
How I picked what's on this page
There are two products here and they do different jobs.
The first is the whole point of the article: a complete 1-gallon root beer kit. I want the shortest possible line between "I'd like to try this" and "there is soda in my refrigerator." That means equipment and supplies in the same box, a footprint that fits an apartment kitchen, and instructions with real numbers in them instead of "trust your instincts."
The second is a small, low-cost add-on for the same shelf. It isn't a kit and it isn't going to make the soda for you, and I say so plainly in its section below rather than dressing it up.
Three criteria decide what makes this page. Everything for day one has to be in the box, because a kit that sends you back to the store for a missing piece on brew day already failed. Nothing in it can need babysitting, because cheap gear that demands attention mid-batch is the most expensive gear you can own. And it has to be honest about what it is. A one-gallon starter kit is not a brewery, and a listing that oversells the box is a listing I'd rather you skip.
The gear I'd start with
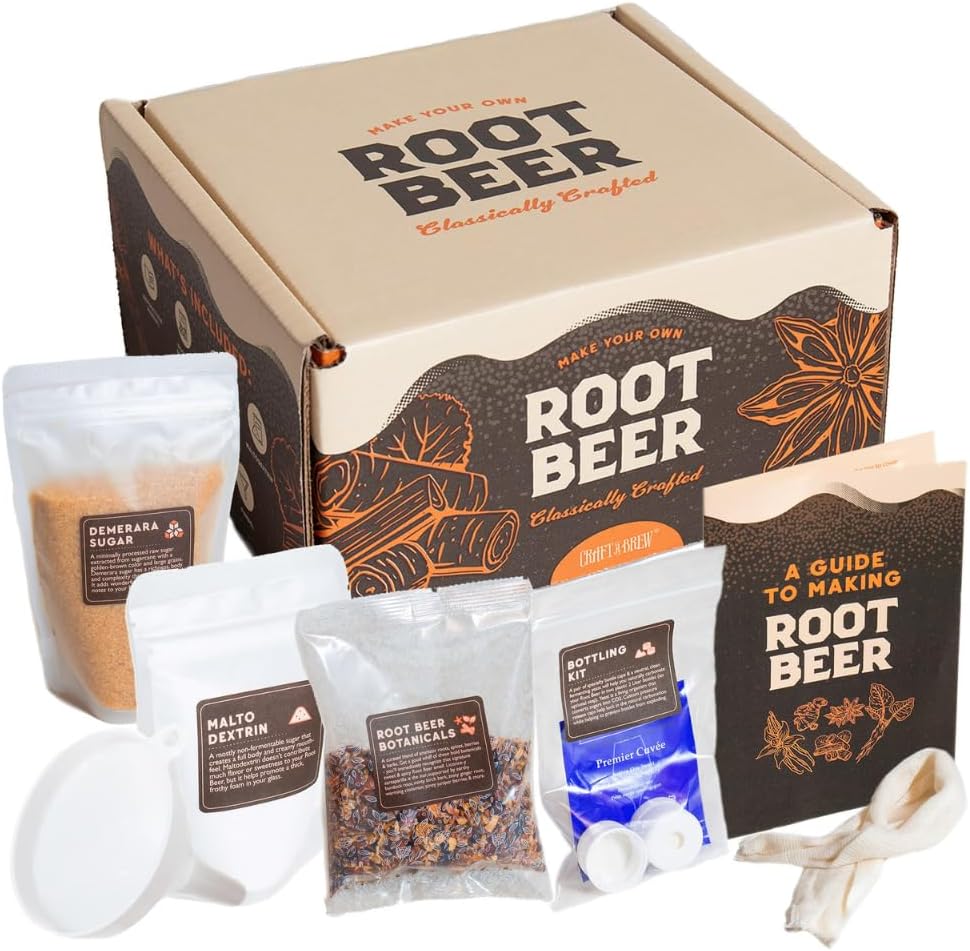
Our pick: Craft A Brew - DIY Make Your Own Craft Root Beer - Complete Equipment and Supplies - Starter Home Brewing Kit - 1 Gallon
 Visit on Amazon →
This is the one to start with, and the reason is the word "complete." Craft A Brew built this as a 1-gallon starter kit: equipment and supplies in one box, sized for a kitchen counter, with a process short enough to run on a Sunday afternoon and drink the same week. Check current Amazon price before you commit, since kit pricing moves with what's in the box.
The 1-gallon size is the feature, not the compromise. It's roughly ten 12-ounce bottles, which is enough to learn on and small enough that a mistake costs you ten bottles instead of fifty. If your first small batch is mediocre, you're out an afternoon. If your first 5-gallon batch is mediocre, you're out a kettle, a fermenter, and a chunk of your enthusiasm.
Flaws but not dealbreakers: Ten bottles go fast, and a kit is a recipe rather than a formula. You're making the root beer the box makes, not dialing in your own sassafras and vanilla ratio. That's batch three, not batch one. Get one clean batch into the refrigerator first, then start tinkering.
Anyone in an apartment, a small kitchen, or a house where brewing gear has to live on a shelf between batches will get the most out of this.
Budget pick: The Quiet One
 Visit on Amazon →
Here's the honest version, because this site doesn't run padded blurbs. The Quiet One is the smallest line item on this page, and the listing is the authority on what it is and what it fits, not me. I haven't run this one on my bench, and I'm not going to write a paragraph of adjectives to cover that gap. Check current Amazon price and read the description before you decide.
What I can tell you is why it's on the page at all, and it comes down to the name. One-gallon brewing happens on a kitchen counter, a few feet from somebody trying to read a book. In that setting, quiet is not a marketing word. It's the difference between a hobby your household tolerates and one it starts negotiating about. If a product's whole identity is being the quiet option, that's a feature I understand.
Flaws but not dealbreakers: I can't vouch for how it holds up over a hundred uses, so treat the reviews as your bench test, not mine. Before you add it to a cart, read the listing for fit and size, then read the ten most recent reviews and look for the same complaint in three of them. If you find it, believe it. That rule has saved me more money than any spec sheet.
What to verify before brew day
The kit is described as complete equipment and supplies for a 1-gallon batch, which is the phrase you want to see. Complete means you aren't hunting for a missing gasket on a Saturday afternoon. Still, confirm four things before you start.
- Bottles and caps. A gallon is roughly ten 12-ounce bottles. If they're in the kit, great. If they aren't, buy bottles rated to hold pressure.
- A pot big enough to heat water and dissolve sugar. Most kitchens already have one. It doesn't need to be a brew kettle.
- A funnel or a filling method that doesn't flood your counter. Check whether the kit covers it.
- Sanitizer. If it's included, use it exactly as directed. If it isn't, buy some. This is not the place to improvise with dish soap.
The process, step by step
Step one: Read the whole instruction sheet once before you open anything. Twice if it has numbers in it. The kit's numbers are the recipe. A forum post from 2011 is not.
Step two: Sanitize everything that will touch the soda after the sugar goes in. Bottles, caps, the fermenter, the siphon, the funnel, your hands. Root beer is sugar water with flavoring and no hops, which makes it a friendly place for anything wild to live.
Step three: Mix the base. Heat the water the instructions call for, add the sugar, and stir until it is fully dissolved. Undissolved sugar just sits on the bottom of the jug doing nothing useful. If the kit includes a flavoring, add it after the sugar is in solution.
Step four: Top off to the one-gallon mark with cool water. Cold water does two jobs here: it gets you to volume and it drops the temperature toward something yeast can survive.
Step five: Check the temperature against the sheet before the yeast goes in. This is the step where first-timers guess. Don't. Too warm and you cook the yeast or drive off the flavor. Use a thermometer, hit the number the kit gives you, and write down what you actually hit.
Step six: Pitch the yeast the way the sheet says. Some one-gallon kits put the yeast in the jug and have you bottle after a short ferment. Others have you bottle right away and let the yeast carbonate in the bottle. Both work. What matters is that you follow the sheet you have, because how much sugar is left for the yeast is the whole ballgame.
Step seven: Bottle with the right headspace. Fill to the level the instructions specify, cap tight, and wipe the bottle mouths. Headspace isn't decoration, it's the room the CO2 needs.
Step eight: Let it carbonate at room temperature for the time the sheet specifies, then check one bottle. Your first batch is where you learn what your kitchen's ambient temperature does to carbonation speed. A 68°F kitchen and a 76°F kitchen are not the same batch.
Step nine: Refrigerate the whole batch the moment carbonation is where you want it. Cold slows the yeast down and stops the process. This is the single step that separates soda from a cleanup project. Don't leave a carbonated batch sitting warm because you'll get to it tomorrow.
Step ten: Log it. Date, room temperature, how many days it took to carbonate, how it tasted. That notebook is the only reason my second batch was better than my first.
Where one-gallon soda batches go wrong
Four failures cover almost every bad first batch I've seen.
Bottle bombs. Root beer's yeast doesn't stop when the soda tastes right. It stops when you get it cold. Bottle a batch, leave it warm, and you've built a small pressure vessel out of glass. Use bottles rated for pressure, check them daily once they're carbonating, and get the batch into the refrigerator on schedule.
Gushers. This is the mild version of the same problem. A couple of extra days at room temperature, or a warmer room than you planned for, and every bottle foams over the glass when you open it. Carbonation speed tracks temperature. If your kitchen runs warm, check earlier than the sheet says.
Dirty bottles. Dish soap residue kills the foam and tastes like soap. A missed spot of old soda tastes like a bandage. Sanitize properly and don't dry with a towel that's been sitting out on the counter.
Guessing instead of measuring. No thermometer on the mix, no note on room temperature, no record of how long carbonation took. You can make soda that way once. You can't repeat it.
What this all costs
I'm not going to quote prices, because kit pricing moves with what's in the box and with the season. Check current Amazon price on both products before you commit, and read the listing to see exactly what ships.
The economics of one-gallon brewing are simple. The kit is a one-time buy and the supplies are the recurring cost. You pay once for the fermenter, the bottles, and the hardware, then you pay per batch for flavoring, sugar, and yeast. That's why I'd rather see your first money go to a complete kit than to a piece of equipment you'll only need at batch twenty.
The add-on is the cheapest thing on the page and it is an add-on, not a requirement. If the budget is tight, buy the kit, make one batch, and decide after you've tasted it.
What I left off this list
Five-gallon all-grain systems, all-in-one electric rigs, and beer kits. All of them. Not because they're bad, but because they're batch five, not batch one.
A 5-gallon setup needs a kettle, a heat source, a fermenter, and a place to put all of it. An all-in-one electric system is genuinely great equipment that also asks you to learn a control panel while you're learning to brew. And a beer kit that ships without a way to measure your gravity is a kit that has decided you don't need to know what you made.
Root beer first is a deliberate choice. It's the cheapest batch you can brew, it's the fastest to drink, and every skill you use on it, sanitizing, temperature control, bottling, chilling on schedule, is a skill you'll use on beer later.
Questions I get every week
Do I need a hydrometer for this? Not the way you do for beer. Root beer's job is carbonation, not attenuation, so you're watching the calendar and the refrigerator instead of a gravity reading. If you move to beer later, buy a hydrometer before anything else and calibrate it in distilled water at 60°F.
How long until I can drink it? Plan on a few days to carbonate at room temperature and a night in the refrigerator, and use the kit's own timing as the authority. Your kitchen temperature is the variable that moves that number.
Will it be alcoholic? Made this way it's a soda. The yeast is there to make bubbles, and getting the batch cold on schedule is what keeps it that way.
Can I reuse the equipment for beer? Yes, with one caveat: clean it thoroughly. Root beer flavoring is persistent, and a stout that tastes faintly of wintergreen is a memorable batch for the wrong reason.
That's the whole job. One gallon, one afternoon, and a refrigerator full of soda you made yourself. Log the batch, keep the notebook, and the second one will be better than the first. That's the only promise in this hobby I'll make.