Most people who quit home brewing quit after batch one, and the recipe is almost never the reason. It is extract scorched onto the bottom of a pot, a fermenter parked next to a furnace register, or beer bottled two days before fermentation actually finished. A 2 gallon home brew kit is the smallest setup that still makes real beer, and after twelve years and more than 50 logged batches it is still the first purchase I recommend to anyone who asks.
I started on a Mr. Beer kit in 2014, on a dorm-room hot plate, and I scorched the extract so badly that I invented a style I still call burnt adjunct lager. Since then I have brewed everything from a 1.030 session bitter to a 1.100 barleywine, and I spent three years as the assistant brewer at a 7-barrel brewpub in Grand Rapids, where I scrubbed heat exchangers, harvested yeast, and ran gravity and pH checks on every tank every day.
Here is the part nobody tells you: a two-gallon batch fits on a kitchen stove, fits in a closet, and costs little enough that ruining one is a lesson instead of a crisis. What separates a first batch from a tenth batch is not the kit. It is a process you repeat and a notebook you actually write in.
Why you should trust me
I have more than 50 batches in a spiral notebook, with a spreadsheet backup my wife keeps threatening to recycle. Every one of them has an original gravity and a final gravity read on a hydrometer I calibrate in distilled water at 60°F before the brew day starts. A hydrometer that reads 0.002 high in the morning reads 0.002 high all day, so the correction gets written down next to the numbers it produced.
At the brewpub I ran pH and gravity checks on every tank, every day, and that job is where the habit behind MaltDock came from: measure everything and write it down. Strike temperature, mash pH, 24-hour gravity, packaging losses, garage temperature, all of it. If a number is not in the notebook, it did not happen.
Cheap gear that fails mid-batch has cost me three ruined brew days, including a pump that died in the middle of a sparge and a plastic spigot that dripped through an entire bottling session. Nothing gets recommended here until it has survived a full brew day without embarrassing itself.
How I picked and how I tested
This list is short on purpose. One kit, one small add-on, and a process you can repeat. I do not recommend a kit I have not brewed on, and I do not recommend a product I would not use for my own next batch.
The kit below is the one I learned on, so it has more brew days behind it than anything else on my stand. Every batch got the same treatment: sanitizer on everything that touches wort after the boil, a hydrometer reading before pitching and again at packaging, and fermentation temperature logged twice a day.
The numbers I trust are original gravity, final gravity, and the attenuation between them. A beer that finishes at 1.020 instead of 1.010 is not sweet, it is under-attenuated, and the only way to know is to measure. If a kit ships without a hydrometer, that is the first thing I would add to the order, because you cannot brew consistently with a tool you do not have.
What a 2-gallon kit actually gives you
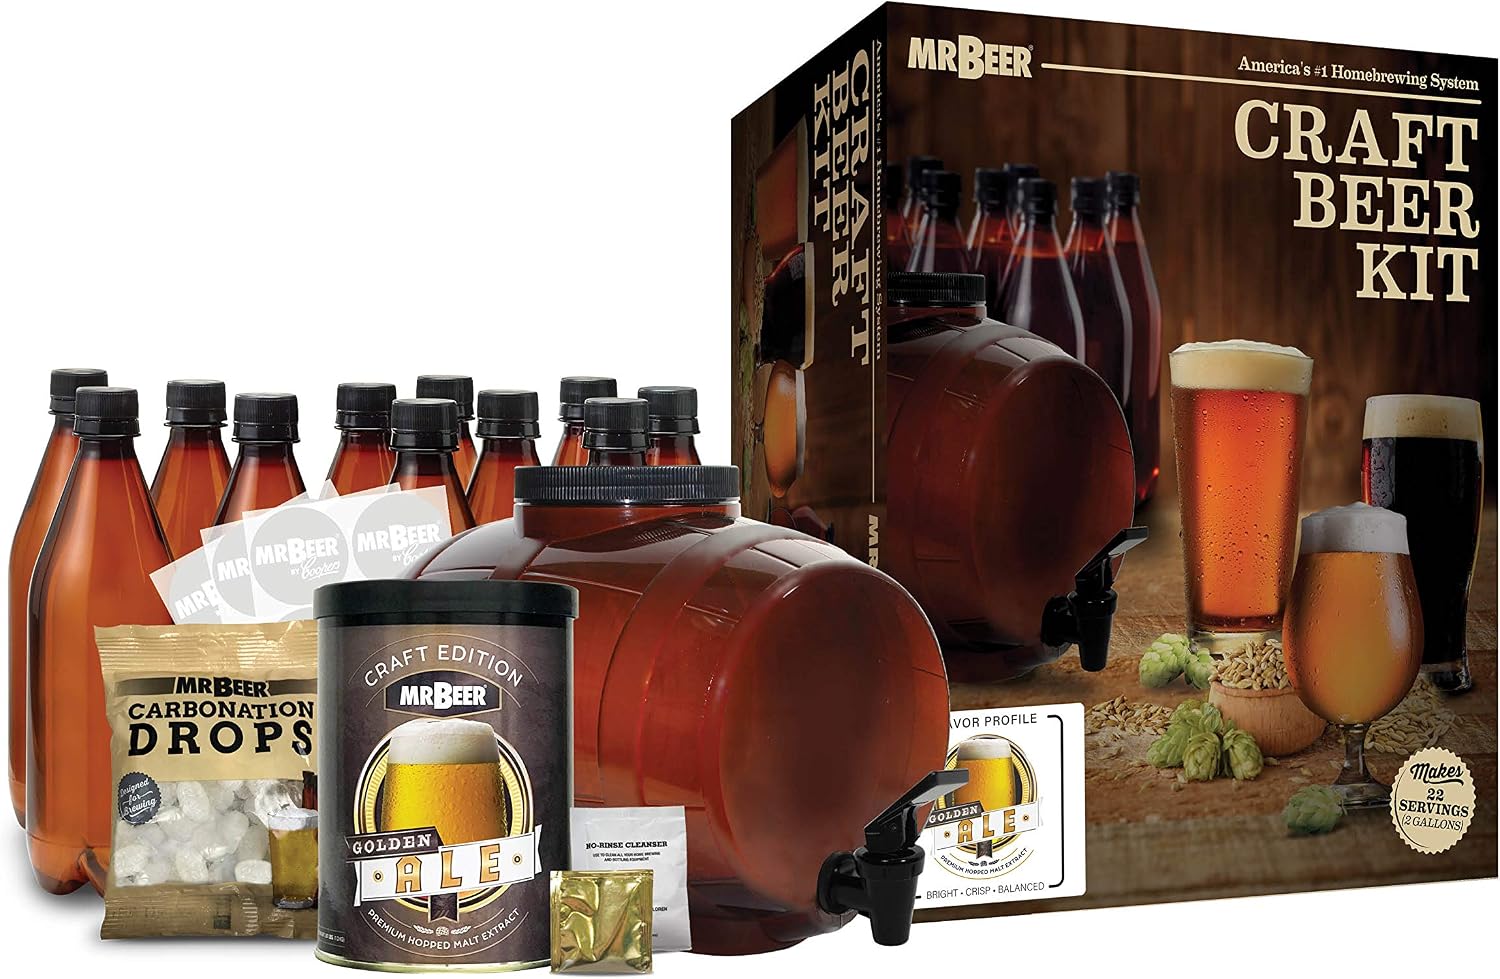
Read the listing before you buy anything, because "complete kit" means different things at different prices. The Mr. Beer kit below is a 2 gallon setup with a 2 gallon keg, reusable 25 oz bottles, and a Golden Ale refill, which covers the fermenter, the packaging, and your first batch of beer.
What it does not do is hold your hand on temperature or measure gravity for you. Two gallons is a small batch, so expect a short run of bottles rather than a full case, and plan to drink it fresh. The equipment is reusable, which is the whole point: the recurring cost of this hobby is extract and yeast, not gear.
Caveats I would put on the box: the fermenter is plastic, so treat the spigot like the weak point it is. Do not overtighten it, do not let hop sludge dry on it, and keep a spare on hand. And buy a hydrometer the same day if the kit does not include one.
The two things I would buy first
The starter kit: Mr. Beer - Craft Beer Making Kit (2 Gallon) Complete DIY Home Brew Set | Beer Making Kit for Beginners Everything Included | Reusable 25 oz Bottles | 2 Gallon Keg | Golden Ale
 Visit on Amazon →
This is the kit I started on in 2014, and it is the one I hand to friends who want to get into brewing without turning a kitchen into a chemistry lab. The 2 gallon keg is the fermenter and the bottling vessel, the 25 oz bottles are reusable, and the Golden Ale refill means you can brew the day it arrives.
What it does well: it keeps a brew day inside one afternoon, it fits a stove and a closet, and it makes a beer that is genuinely drinkable while you learn what a hydrometer reading means. Beginners do not need a bigger system. They need more repetitions, and a two-gallon batch gets you repetitions faster.
Flaws but not dealbreakers: The plastic fermenter is the part that will fail first, and the spigot is the specific failure point. Clean it gently, store it dry, and buy a spare. Verified buyers on this listing tend to say the same thing, that it is a fine way to learn and a poor way to stay, which matches my own experience. It got me to batch two, and batch two is where the hobby actually starts.
Anyone who wants to find out whether they like brewing before spending all-in-one-system money should start here.
The small add-on: The Quiet One
 Visit on Amazon →
The Quiet One is the other half of a sensible first order: small, inexpensive, and easy to skip. Do not skip it. My rule for anything in this price class is simple. If it touches wort after the boil, it has to survive sanitizer and a hot rinse. If it does not touch wort, it just has to survive being dropped on a garage floor.
Where it earns its place is the two weeks between brew day and bottling, when two gallons of beer are sitting in a closet and the only thing you want from your gear is that it works without needing attention. That is the entire pitch of a small accessory like this one, and it is a better pitch than any feature list on the box.
Flaws but not dealbreakers: It will not measure gravity, hold fermentation temperature, or rescue an under-attenuated batch. Those are still your job, and no add-on in this price class changes that. Buy it because it removes a small annoyance from your brew day, not because it makes beer for you.
Anyone brewing in an apartment or a shared house, where a loud or fussy brew day would be a problem, will get the most out of it.
The brew day, start to finish
Everything below works for any two-gallon extract batch, including the kit above. The order matters more than the gear.
Step one: calibrate the hydrometer. Distilled water at 60°F should read 1.000. If yours reads 0.998 or 1.002, write the correction in your notebook and apply it to every reading for the rest of the batch. Do this before the brew day, not during it.
Step two: clean, then sanitize. These are two different jobs with two different products. Clean means removing organic residue with a brush and hot water. Sanitize means killing what is left on surfaces that will touch wort after the boil. Skipping the first step makes the second one useless.
Step three: build the wort. Boil about a gallon of water, pull it off the heat, and stir the extract in until it is fully dissolved. This is where my first batch died: extract sitting on the bottom of a hot pot scorches in seconds and there is no fixing it. Stir first, then apply heat. Top up to two gallons with cold water.
Step four: chill to pitching temperature. You want the wort between 65 and 70°F before yeast goes in. A sink full of ice water and 20 minutes of gentle stirring will get a two-gallon batch there faster than you expect. Pitching warm is how you get banana and bubblegum, which is exactly what my 82°F first batch tasted like.
Step five: take the original gravity. Pull a sample, cool it to 60°F, read it, and write it down. This number plus your final gravity tells you your alcohol by volume and whether the yeast finished the job.
Step six: aerate and pitch. Splash the wort, stir it hard with a sanitized spoon, or shake the fermenter with the lid on. Then add the yeast and seal it up.
Step seven: ferment at 65 to 68°F. Ambient room temperature is not fermentation temperature. Active fermentation runs a few degrees warmer than the room, so a 70°F closet can put your beer at 73°F. Log the temperature twice a day. Do not trust the airlock for information about fermentation. Trust the hydrometer.
Step eight: confirm the final gravity. Take a reading when the bubbling slows, then take another two days later. If the two numbers match, fermentation is done. If they do not, wait. Bottling early is how you make bottle bombs.
Step nine: prime and bottle. Dissolve your priming sugar in a cup of boiling water, let it cool, add it to the bottling vessel, and rack the beer onto it without splashing. Fill the reusable bottles, cap them, and keep them in the dark at room temperature for about two weeks.
Step ten: chill and drink. Two days in the fridge settles the carbonation and drops the yeast. Drink the batch within a couple of months, because a small, low-gravity beer is at its best fresh.
The mistakes that ruin a first two-gallon batch
- Bottling before the gravity is stable. Two matching readings two days apart, or you wait.
- Fermenting at room temperature without checking it. 82°F tastes like banana bubblegum, and I know because I did it.
- Sanitizing with a dirty brush. Clean first, sanitize second, in that order.
- Trusting airlock bubbles. A cold fermenter can sit silent while the yeast is still working.
- Overtightening the plastic spigot. Snug is enough, and a spare costs less than a lost batch.
- Not writing anything down. If you do not log the gravity and the temperature, you cannot repeat the batch you liked.
- Walking away from the kettle at the start of the boil. That is when a boilover happens, and it happens at full volume every time.
What this costs
The order is two items: the kit and the small add-on. Use the links above and Check current Amazon price on each one, then weigh that total against what you would spend on a few cases of craft beer, because that is the real benchmark.
The number that matters after that is cost per batch. The keg and the reusable bottles are equipment, and they do not get consumed. Extract, yeast, and priming sugar do, so your second batch costs a fraction of your first, and your fifth costs less than a night out. The expensive mistake in this hobby is buying twice: a five-gallon system you are not ready for, then the small kit you should have started with.
Why I still say start at two gallons
The alternatives are a five-gallon bucket kit, a one-gallon all-grain kit, or an all-in-one electric system that costs more than everything else on this page combined. All three are fine tools at the right time.
Five gallons means a bigger pot, a bigger fermenter, and a bigger mistake when something goes wrong. One gallon is a great teacher, but you will outgrow it by batch three. The all-in-one electric systems are a batch-five purchase, not a batch-one purchase, and no electric system makes better beer than a clean, temperature-controlled two-gallon batch.
Start small, brew often, log everything, and upgrade when the equipment is the thing holding you back. That is the whole method, and it has not changed in twelve years.
Two gallons, a hydrometer, and a notebook. That is the entire hobby, and the kit above is enough to start it this weekend.